고정 헤더 영역

상세 컨텐츠
본문 제목
044. Raspberry Pi 라즈베리파이 - 맥북에 라즈베리 파티션(ext4) 마운트 하기(mounted ext4 for macOS)
본문
반응형

레트로 파이를 새로 설치하려고 하다보니
이전에 넣어놨던 ROM파일을 백업을 해야되서
samba로 할까 ftp로 할까 고민하다가
맥에 ext4 파티션을 마운트 해보기로 했습니다
파일시스템이 다르니 일단 툴을 설치해야 합니다
1. install osxfuse, extfuse
brew cask install osxfuse
|
admin:~ admin$ brew cask install osxfuse Updating Homebrew... Fast-forwarded master to origin/master. ==> Auto-updated Homebrew! Updated 1 tap (homebrew/core). ==> New Formulae ahoy libgr aliyun-cli libgusb allureofthestars libkeccak
. . .
==> Tapping homebrew/cask Cloning into '/usr/local/Homebrew/Library/Taps/homebrew/homebrew-cask'... remote: Enumerating objects: 3650, done. remote: Counting objects: 100% (3650/3650), done. remote: Compressing objects: 100% (3641/3641), done. remote: Total 3650 (delta 23), reused 614 (delta 7), pack-reused 0 Receiving objects: 100% (3650/3650), 1.21 MiB | 1.23 MiB/s, done. Resolving deltas: 100% (23/23), done. Tapped 1 command and 3540 casks (3,655 files, 3.9MB). ==> Caveats To install and/or use osxfuse you may need to enable its kernel extension in: System Preferences → Security & Privacy → General For more information refer to vendor documentation or this Apple Technical Note: https://developer.apple.com/library/content/technotes/tn2459/_index.html
You must reboot for the installation of osxfuse to take effect.
==> Satisfying dependencies ==> Downloading https://github.com/osxfuse/osxfuse/releases/download/osxfuse-3.1 ==> Downloading from https://github-production-release-asset-2e65be.s3.amazonaws ######################################################################## 100.0% ==> Verifying SHA-256 checksum for Cask 'osxfuse'. ==> Installing Cask osxfuse ==> Creating Caskroom at /usr/local/Caskroom ==> We'll set permissions properly so we won't need sudo in the future. Password: ==> Running installer for osxfuse; your password may be necessary. ==> Package installers may write to any location; options such as --appdir are i installer: Package name is FUSE for macOS installer: Upgrading at base path / installer: The upgrade was successful. ==> Changing ownership of paths required by osxfuse; your password may be necess 🍺 osxfuse was successfully installed! admin:~ admin$ |
brew install ext4fuse
|
admin:~ admin$ brew install ext4fuse Updating Homebrew... ==> Auto-updated Homebrew! Updated 1 tap (homebrew/core). ==> Updated Formulae minio-mc
==> Downloading https://homebrew.bintray.com/bottles/ext4fuse-0.1.3.mojave.bottl ######################################################################## 100.0% ==> Pouring ext4fuse-0.1.3.mojave.bottle.tar.gz 🍺 /usr/local/Cellar/ext4fuse/0.1.3: 5 files, 50.9KB ==> `brew cleanup` has not been run in 30 days, running now... Removing: /Users/admin/Library/Caches/Homebrew/tree--1.8.0.mojave.bottle.tar.gz... (49.9KB) Removing: /Users/admin/Library/Caches/Homebrew/mpfr-4.0.1.high_sierra.bottle.tar.gz... (1.1MB) Removing: /Users/admin/Library/Caches/Homebrew/gdal-2.3.1_1.high_sierra.bottle.tar.gz... (16.1MB) Removing: /Users/admin/Library/Caches/Homebrew/sfcgal-1.3.5.high_sierra.bottle.tar.gz... (2.0MB)
. . .
Removing: /Users/admin/Library/Logs/Homebrew/jpeg... (64B) Removing: /Users/admin/Library/Logs/Homebrew/openssl... (64B) Pruned 0 symbolic links and 2 directories from /usr/local admin:~ admin$ |
fuse 를 설치하고 sd카드를 삽입하면 boot 디렉토리만 보이는데
Linux(ext4) 파티션을 찾아야 합니다
2. find sdcard
diskutil list
|
admin:~ admin$ diskutil list /dev/disk0 (internal, physical): #: TYPE NAME SIZE IDENTIFIER 0: GUID_partition_scheme *500.3 GB disk0 1: EFI EFI 209.7 MB disk0s1 2: Apple_APFS Container disk1 425.0 GB disk0s2 3: Microsoft Basic Data BOOTCAMP 75.1 GB disk0s3
/dev/disk1 (synthesized): #: TYPE NAME SIZE IDENTIFIER 0: APFS Container Scheme - +425.0 GB disk1 Physical Store disk0s2 1: APFS Volume Macintosh HD 388.2 GB disk1s1 2: APFS Volume Preboot 85.5 MB disk1s2 3: APFS Volume Recovery 1.0 GB disk1s3 4: APFS Volume VM 1.1 GB disk1s4
/dev/disk2 (external, physical): #: TYPE NAME SIZE IDENTIFIER 0: FDisk_partition_scheme *15.9 GB disk2 1: Windows_FAT_16 boot 59.8 MB disk2s1 2: Linux 15.9 GB disk2s2
admin:~ admin$ |
/dev/disk2s2 로 확인되네요
이제 마운트를 하기위해 마운트할 디렉토리를 만들고 마운트를 진행합니다
3. create mount point & mount sdcard
sudo mkdir /Volumes/raspberry
sudo ext4fuse /dev/disk2s2 /Volumes/raspberry -o allow_other
|
admin:~ admin$ sudo mkdir /Volumes/raspberry Password: admin:~ admin$ sudo ext4fuse /dev/disk2s2 /Volumes/raspberry -o allow_other mount_osxfuse: the file system is not available (1) admin:~ admin$ admin:~ admin$ sudo ext4fuse /dev/disk2s2 /Volumes/raspberry -o allow_other admin:~ admin$
|
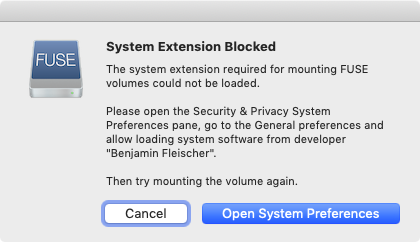
시스템 설정에서 확인되지 않은 개발자라고 확인 메뉴가 나오는데 확인해주고
다시 마운트를 진행하면

읽기 전용으로 마운트가 되는걸 볼수 있습니다
추출은 umount로 진행하면 됩니다
4. unmount
sudo umount /Volumes/raspberry
참고
https://piratefache.ch/mount-raspberry-pi-sd-card-on-mac-os/
반응형


댓글 영역