고정 헤더 영역
상세 컨텐츠
본문
반응형
맥과는 달리 ruby가 설치되있지 않다
관련 패키지를 설치해주자
관련패키지 설치
sudo apt install ruby-full build-essential zlib1g-dev -y
|
pi@rasp-dev:~ $ sudo apt install ruby-full build-essential zlib1g-dev -y Reading package lists... Done Building dependency tree Reading state information... Done build-essential is already the newest version (12.6). zlib1g-dev is already the newest version (1:1.2.11.dfsg-1). zlib1g-dev set to manually installed. The following additional packages will be installed: fonts-lato libgmp-dev libruby2.5 rake ri ruby ruby-dev ruby-did-you-mean ruby-minitest ruby-net-telnet ruby-power-assert ruby-test-unit ruby-xmlrpc ruby2.5 ruby2.5-dev ruby2.5-doc rubygems-integration zip Suggested packages: gmp-doc libgmp10-doc libmpfr-dev bundler The following NEW packages will be installed: fonts-lato libgmp-dev libruby2.5 rake ri ruby ruby-dev ruby-did-you-mean ruby-full ruby-minitest ruby-net-telnet ruby-power-assert ruby-test-unit ruby-xmlrpc ruby2.5 ruby2.5-dev ruby2.5-doc rubygems-integration zip 0 upgraded, 19 newly installed, 0 to remove and 1 not upgraded. Need to get 9,895 kB of archives. . . .
Unpacking zip (3.0-11) ... Setting up fonts-lato (2.0-2) ... Setting up libgmp-dev:armhf (2:6.1.2+dfsg-4) ... Setting up ruby-power-assert (1.1.1-1) ... Setting up rubygems-integration (1.11+deb10u1) ... Setting up ruby-minitest (5.11.3-1) ... Setting up zip (3.0-11) ... Setting up ruby-test-unit (3.2.8-1) ... Setting up ruby-net-telnet (0.1.1-2) ... Setting up ruby-did-you-mean (1.2.1-1) ... Setting up ruby-xmlrpc (0.3.0-2) ... Setting up ruby2.5-doc (2.5.5-3+deb10u1) ... Setting up ruby2.5 (2.5.5-3+deb10u1) ... Setting up ri (1:2.5.1) ... Setting up ruby (1:2.5.1+b1) ... Setting up rake (12.3.1-3+deb10u1) ... Setting up libruby2.5:armhf (2.5.5-3+deb10u1) ... Setting up ruby2.5-dev:armhf (2.5.5-3+deb10u1) ... Setting up ruby-dev:armhf (1:2.5.1+b1) ... Setting up ruby-full (1:2.5.1) ... Processing triggers for fontconfig (2.13.1-2) ... Processing triggers for libc-bin (2.28-10+rpi1) ... Processing triggers for man-db (2.8.5-2) ... pi@rasp-dev:~ $ |
ruby, gem 환경변수 추가
.bashrc 파일에 환경변수를 추가해줘야 한다 (초기 한번만 해주면된다)
문서에 있는 그대로 해주면된다
|
echo '# Install Ruby Gems to ~/gems' >> ~/.bashrc |
출처: https://jekyllrb-ko.github.io/docs/installation/ubuntu/
|
pi@rasp-dev:~ $ echo '# Install Ruby Gems to ~/gems' >> ~/.bashrc pi@rasp-dev:~ $ echo 'export GEM_HOME="$HOME/gems"' >> ~/.bashrc pi@rasp-dev:~ $ echo 'export PATH="$HOME/gems/bin:$PATH"' >> ~/.bashrc pi@rasp-dev:~ $ source ~/.bashrc pi@rasp-dev:~ $ |
잠깐 덧붙치자면, 로그인할때 사용자계정 디렉토리안에 있는 .bashrc를 자동으로 실행해준다(사용자별 환경변수)
jekyll bundler 설치
gem install jekyll bundler
|
pi@rasp-dev:~ $ gem install jekyll bundler Successfully installed jekyll-4.1.1 Parsing documentation for jekyll-4.1.1 Done installing documentation for jekyll after 14 seconds Successfully installed bundler-2.1.4 Parsing documentation for bundler-2.1.4 Done installing documentation for bundler after 38 seconds 2 gems installed pi@rasp-dev:~ $ |
이미 설치해서 설치할게 없..
jekyll 명령어로 블로그를 추가 해주자
블로그 생성
jekyll new blog
|
pi@rasp-dev:~ $ pwd /home/pi pi@rasp-dev:~ $ jekyll new blog Running bundle install in /home/pi/blog... Bundler: Fetching gem metadata from https://rubygems.org/.......... Bundler: Fetching gem metadata from https://rubygems.org/. Bundler: Resolving dependencies..... Bundler: Using public_suffix 4.0.5 Bundler: Using addressable 2.7.0 Bundler: Using bundler 2.1.4 Bundler: Using colorator 1.1.0 Bundler: Using concurrent-ruby 1.1.6 Bundler: Using eventmachine 1.2.7 Bundler: Using http_parser.rb 0.6.0 Bundler: Using em-websocket 0.5.1 Bundler: Using ffi 1.13.1 Bundler: Using forwardable-extended 2.6.0 Bundler: Using i18n 1.8.3 Bundler: Using sassc 2.4.0 Bundler: Using jekyll-sass-converter 2.1.0 Bundler: Using rb-fsevent 0.10.4 Bundler: Using rb-inotify 0.10.1 Bundler: Using listen 3.2.1 Bundler: Using jekyll-watch 2.2.1 Bundler: Using rexml 3.2.4 Bundler: Using kramdown 2.3.0 Bundler: Using kramdown-parser-gfm 1.1.0 Bundler: Using liquid 4.0.3 Bundler: Using mercenary 0.4.0 Bundler: Using pathutil 0.16.2 Bundler: Using rouge 3.20.0 Bundler: Using safe_yaml 1.0.5 Bundler: Using unicode-display_width 1.7.0 Bundler: Using terminal-table 1.8.0 Bundler: Using jekyll 4.1.1 Bundler: Using jekyll-feed 0.14.0 Bundler: Using jekyll-seo-tag 2.6.1 Bundler: Using minima 2.5.1 Bundler: Bundle complete! 6 Gemfile dependencies, 31 gems now installed. Bundler: Use `bundle info [gemname]` to see where a bundled gem is installed.The dependency tzinfo (~> 1.2) will be unused by any of the platforms Bundler is installing for. Bundler is installing for ruby but the dependency is only for x86-mingw32, x64-mingw32, x86-mswin32, java. To add those platforms to the bundle, run `bundle lock --add-platform x86-mingw32 x64-mingw32 x86-mswin32 java`. Bundler: The dependency tzinfo-data (>= 0) will be unused by any of the platforms Bundler is installing for. Bundler is installing for ruby but the dependency is only for x86-mingw32, x64-mingw32, x86-mswin32, java. To add those platforms to the bundle, run `bundle lock --add-platform x86-mingw32 x64-mingw32 x86-mswin32 java`. Bundler: The dependency wdm (~> 0.1.1) will be unused by any of the platforms Bundler is installing for. Bundler is installing for ruby but the dependency is only for x86-mingw32, x64-mingw32, x86-mswin32. To add those platforms to the bundle, run `bundle lock --add-platform x86-mingw32 x64-mingw32 x86-mswin32`. New jekyll site installed in /home/pi/blog. pi@rasp-dev:~ $ |
설치 끗
문서에 bundle update 자주하라고 하니 해주자
bundle update
|
pi@rasp-dev:~/blog $ bundle update The dependency tzinfo (~> 1.2) will be unused by any of the platforms Bundler is installing for. Bundler is installing for ruby but the dependency is only for x86-mingw32, x64-mingw32, x86-mswin32, java. To add those platforms to the bundle, run `bundle lock --add-platform x86-mingw32 x64-mingw32 x86-mswin32 java`. The dependency tzinfo-data (>= 0) will be unused by any of the platforms Bundler is installing for. Bundler is installing for ruby but the dependency is only for x86-mingw32, x64-mingw32, x86-mswin32, java. To add those platforms to the bundle, run `bundle lock --add-platform x86-mingw32 x64-mingw32 x86-mswin32 java`. The dependency wdm (~> 0.1.1) will be unused by any of the platforms Bundler is installing for. Bundler is installing for ruby but the dependency is only for x86-mingw32, x64-mingw32, x86-mswin32. To add those platforms to the bundle, run `bundle lock --add-platform x86-mingw32 x64-mingw32 x86-mswin32`. Fetching gem metadata from https://rubygems.org/.......... Fetching gem metadata from https://rubygems.org/. Resolving dependencies..... Using public_suffix 4.0.5 Using addressable 2.7.0 Using bundler 2.1.4 Using colorator 1.1.0 Using concurrent-ruby 1.1.6 Using eventmachine 1.2.7 Using http_parser.rb 0.6.0 Using em-websocket 0.5.1 Using ffi 1.13.1 Using forwardable-extended 2.6.0 Using i18n 1.8.3 Using sassc 2.4.0 Using jekyll-sass-converter 2.1.0 Using rb-fsevent 0.10.4 Using rb-inotify 0.10.1 Using listen 3.2.1 Using jekyll-watch 2.2.1 Using rexml 3.2.4 Using kramdown 2.3.0 Using kramdown-parser-gfm 1.1.0 Using liquid 4.0.3 Using mercenary 0.4.0 Using pathutil 0.16.2 Using rouge 3.20.0 Using safe_yaml 1.0.5 Using unicode-display_width 1.7.0 Using terminal-table 1.8.0 Using jekyll 4.1.1 Using jekyll-feed 0.14.0 Using jekyll-seo-tag 2.6.1 Using minima 2.5.1 Bundle updated! pi@rasp-dev:~/blog $ |
서버 구동 전에 외부 접속을 할 수 있도록 수정을 해줘야 한다
파이에서 직접 연결한경우에는 상관없지만 외부 접속이 안된다
외부접속 허용: [programing/Jekyll blog] - jekyll 외부접속 허용 포트변경
jekyll 서버구동
bundle exec jekyll serve
|
pi@rasp-dev:~/blog $ bundle exec jekyll serve Configuration file: /home/pi/blog/_config.yml Source: /home/pi/blog Destination: /home/pi/blog/_site Incremental build: disabled. Enable with --incremental Generating... Jekyll Feed: Generating feed for posts done in 4.066 seconds. Auto-regeneration: enabled for '/home/pi/blog' Server address: http://192.168.0.2:4000/ Server running... press ctrl-c to stop. |
서버를 구동했으면 브라우져로 접속해보자
브라우져 테스트
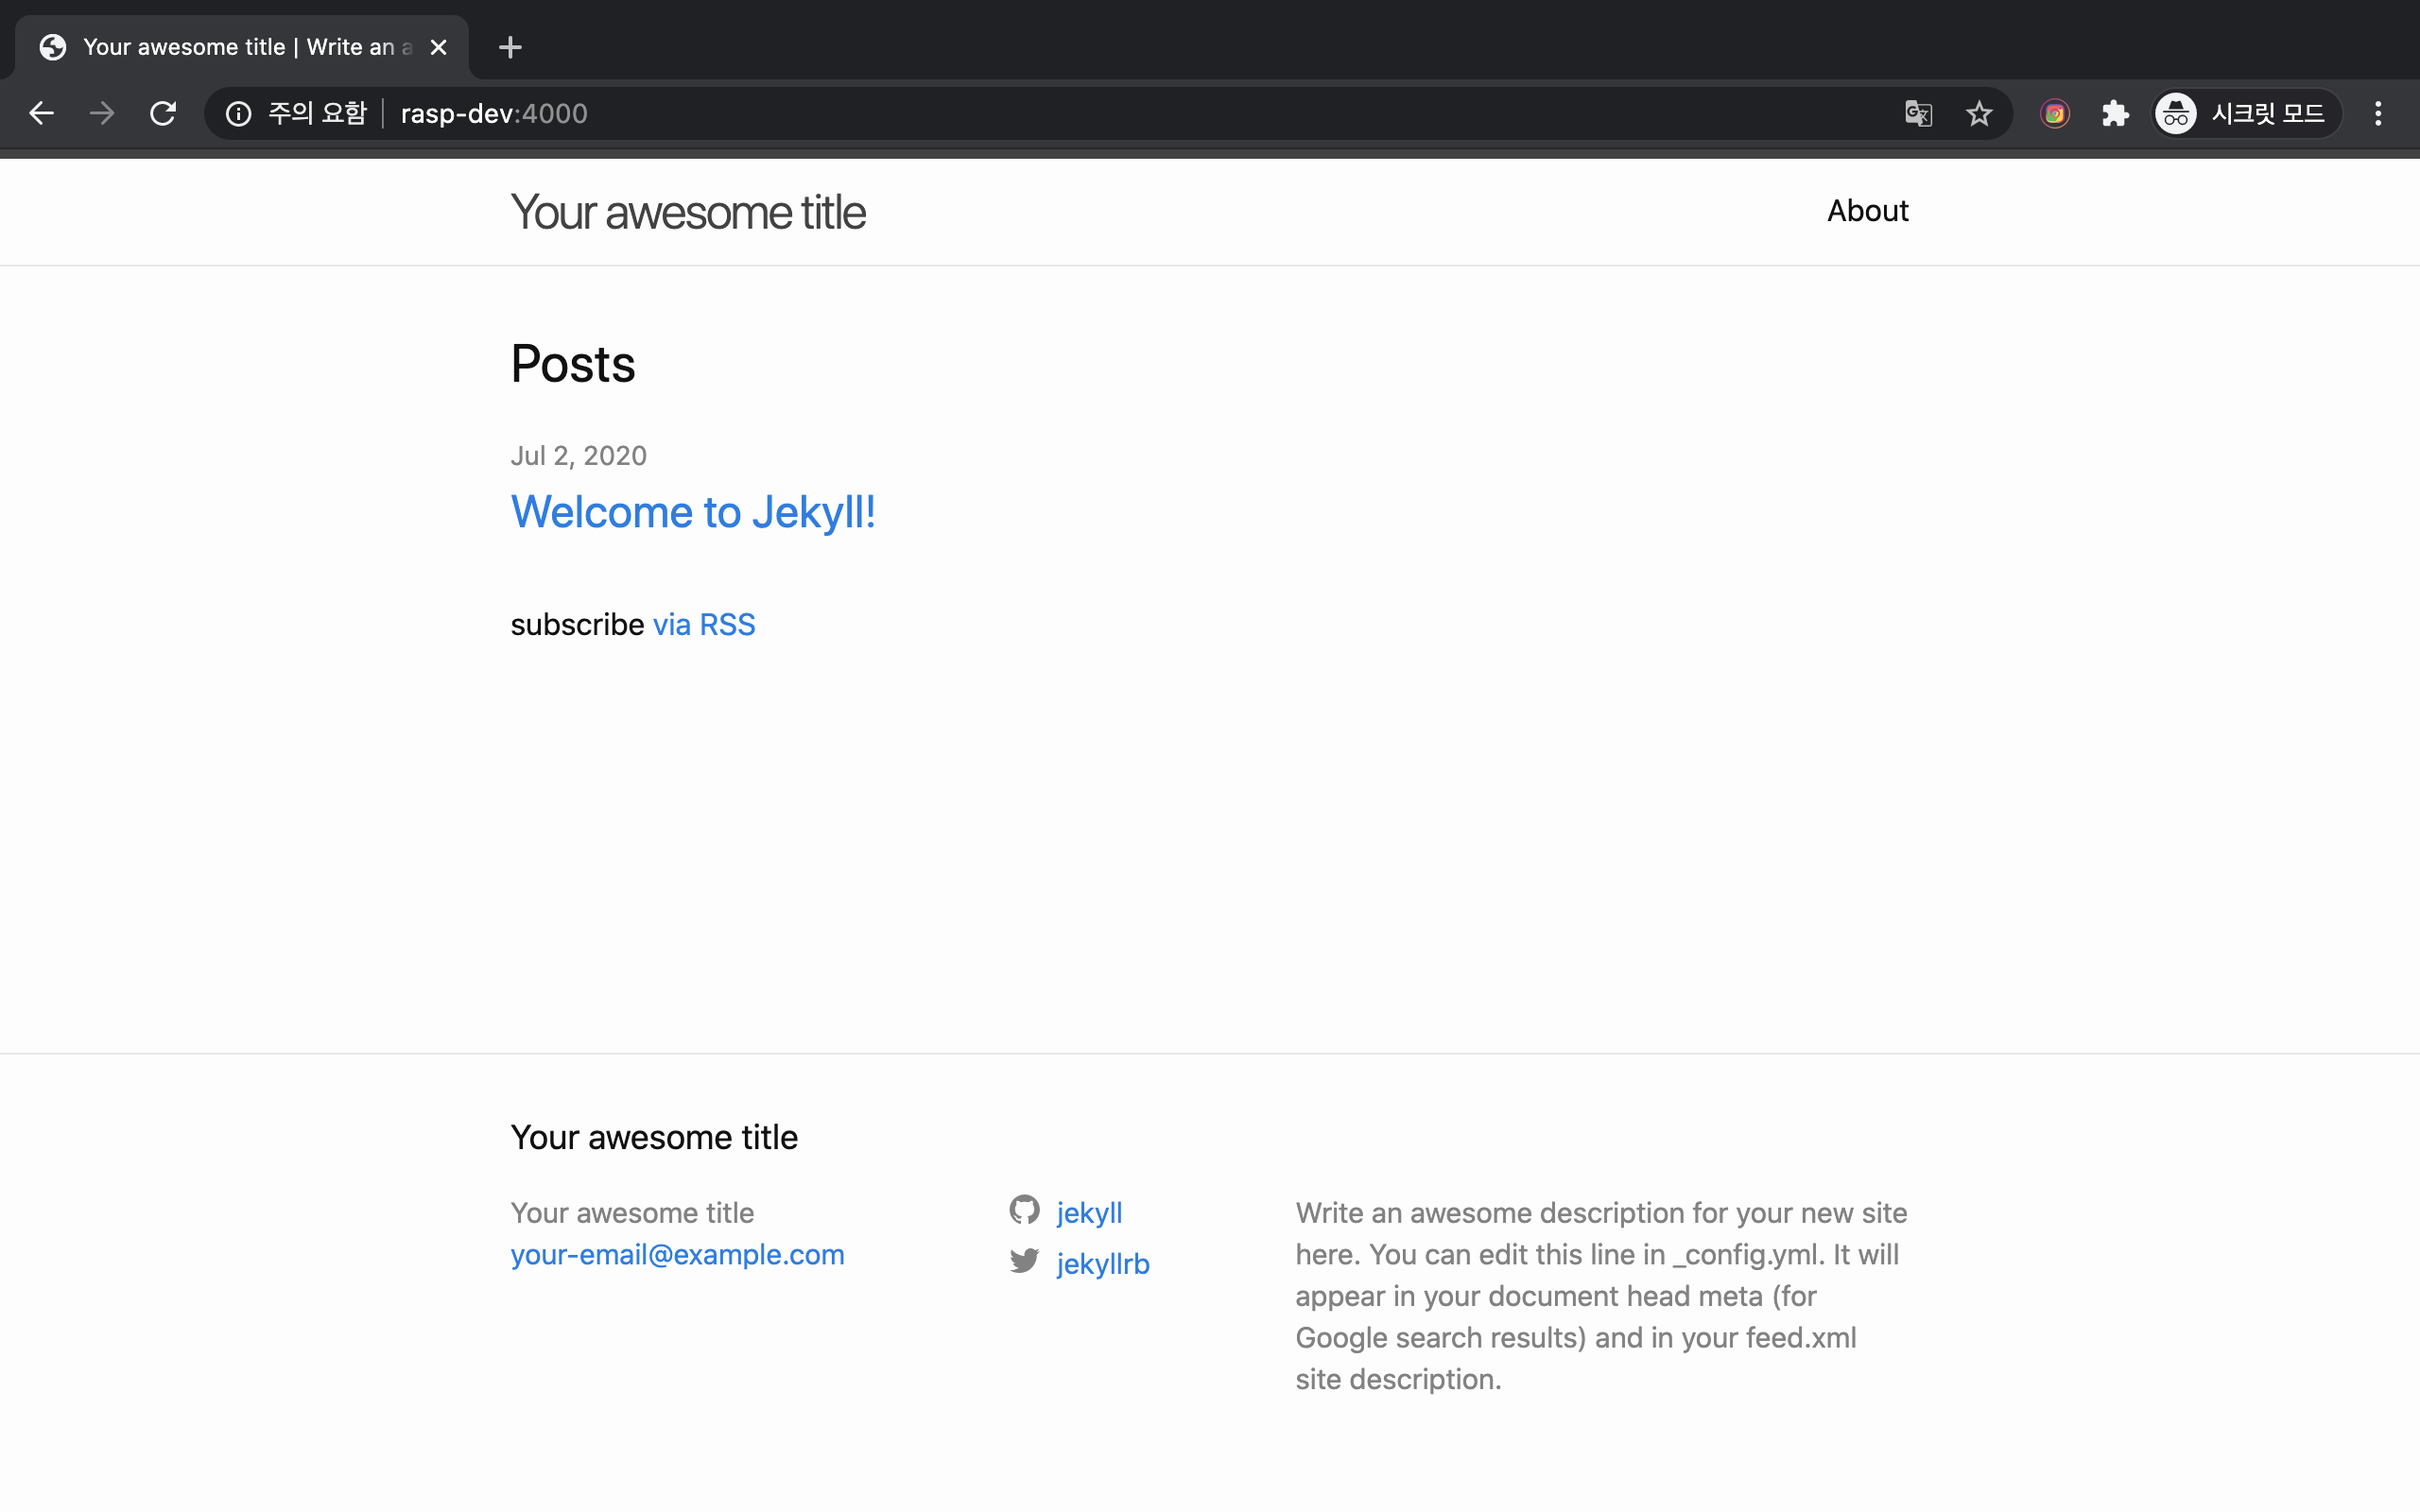
위와같이 뜨면 성공
ip가 아니라 도메인으로 보이는건 hostname으로 접속했기 때문이다
hostname 으로 ping을 해보고 ping이 안나가면
hosts 파일에 IP - 도메인을 직접 넣어서 수정해주면 된다
참고
https://jekyllrb-ko.github.io/docs/installation/ubuntu/
관련글
[programing/Jekyll blog] - jekyll 외부접속 허용 포트변경
반응형
'programing > Jekyll blog' 카테고리의 다른 글
| 지킬 블로그 테마 사용해보기 (Using themes on jekyll) (0) | 2020.07.07 |
|---|---|
| jekyll 디렉토리 구조, 단편화 (0) | 2020.07.06 |
| install jekyll on Windows (0) | 2020.07.03 |
| install jekyll on MacOS (0) | 2020.07.03 |
| jekyll 외부접속 허용 포트변경 (0) | 2020.07.03 |


댓글 영역